Next.js × microCMS におけるページングの実装方法
フロントエンドおはこんにちばんは。今回は Next.js × microCMS で ページングを実装してみました。その手順を紹介しようと思います!
実行環境
- Next.js 10.0.4
- React 17.0.0
- Material-UI 4.11.2
一覧画面の実装
まずは雑に一覧画面を実装します。今回はUIライブラリにMaterial-UIを利用しています。構成しては以下になります。
=============
pages/
page/
[offset].tsx
=============
src/pages/page/[offset].tsx

import { GetStaticPaths, GetStaticProps, NextPage } from 'next'
import React, { useCallback } from 'react'
import { useRouter } from 'next/router';
import { Pagination } from '@material-ui/lab';

const PAGE = 10 as const;

const DynamicPage: NextPage = () => {
  const router = useRouter();
  const offset = router.query.offset
    ? Number.parseInt(String(router.query.offset), 10)
    : 1;

  const handleChangePage = useCallback(
    (_: React.ChangeEvent<unknown>, page: number) => {
      void router.push(`/page/${page}`);
    },
    [router],
  );

  return (
    <div>
      <h1>{router.query.offset}</h1>
      <Pagination
        count={PAGE}
        variant="outlined"
        shape="rounded"
        color="secondary"
        page={offset}
        onChange={handleChangePage}
      />
    </div>
  )
}

export const getStaticPaths: GetStaticPaths = async () => {
  const paths = [...Array(PAGE)].map((_, index) => ({
    params: {
      offset: `${index + 1}`,
    },
  }))

  return { paths, fallback: false };
}

export const getStaticProps: GetStaticProps = async (context) => {
  return {
    props: {},
  }
}

export default DynamicPage;
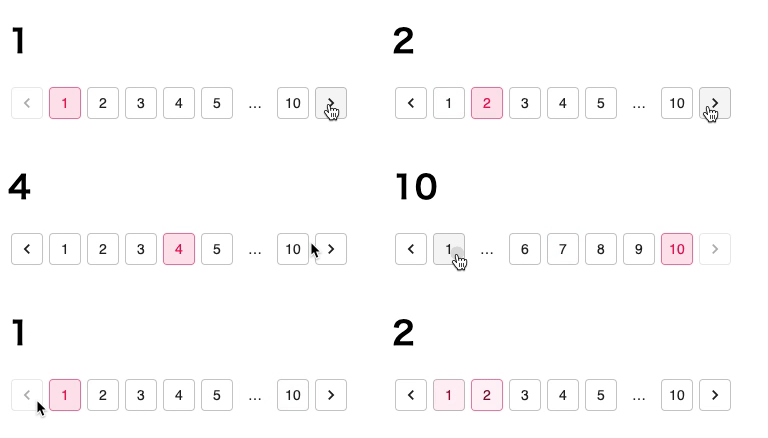
Material-UI の Pagination を使っています。ハンドラーの第二引数に次の page が取れるのでそれを元に次のページに遷移させています。こんな感じになるはずです。
microCMS で取得したコンテンツを利用
microCMS で取得したコンテンツを元にページングしていきます。今回は1ページ 3つまでコンテンツを取得するようにしています。
import { GetStaticPaths, GetStaticProps, NextPage } from 'next'
import React, { useCallback } from 'react'
import { useRouter } from 'next/router';
import { Pagination } from '@material-ui/lab';

const DynamicPage: NextPage = ({ contents }) => {
  const router = useRouter();
  const offset = router.query.offset
    ? Number.parseInt(String(router.query.offset), 10)
    : 1;

  const handleChangePage = useCallback(
    (_: React.ChangeEvent<unknown>, page: number) => {
      void router.push(`/page/${page}`);
    },
    [router],
  );

  return (
    <div>
      <h1>{router.query.offset}</h1>
      <Pagination
        count={Math.ceil(contents.totalCount / contents.limit)}
        variant="outlined"
        shape="rounded"
        color="secondary"
        page={offset}
        onChange={handleChangePage}
      />
    </div>
  )
}

export const getStaticPaths: GetStaticPaths = async () => {

  const key = {
    headers: { 'X-API-KEY': process.env.API_KEY ?? '' },
  };
  const contents = await fetch(
    `https://jun-dev.microcms.io/api/v1/contents?offset=0&limit=3`,
    key,
  )
    .then((res) => res.json())
    .catch(() => null);

  const paths = [...Array(Math.ceil(contents.totalCount / contents.limit))]
    .map((_, i) => i + 1)
    .map((offset) => `/page/${offset}`);

  return { paths, fallback: false };
}

export const getStaticProps: GetStaticProps = async ({ params }) => {
  const offset = params?.offset ? String(params?.offset) : '0';

  const query = {
    offset: String(Math.ceil(Number.parseInt(offset, 10) - 1) * 3),
    limit: '3',
  };

  const key = {
    headers: { 'X-API-KEY': process.env.API_KEY ?? '' },
  };
  const contents = await fetch(
    `https://your-service.microcms.io/api/v1/contents?offset=${query.offset}&limit=${query.limit}`,
    key,
  )
    .then((res) => res.json())
    .catch(() => null);

  return {
    props: {
      contents
    },
  }
}

export default DynamicPage
getStaticPathsでは microCMS で totalCount と limit を返してくれるのでこれを元にpathsを生成しています。
  const paths = [...Array(Math.ceil(contents.totalCount / contents.limit))]
    .map((_, i) => i + 1)
    .map((offset) => `/page/${offset}`);
getStaticPropsではgetStaticPathsで生成したoffsetを元にqueryを生成し、ページ単位でコンテンツを何件目から取得するかを指定しています。
  const offset = params?.offset ? String(params?.offset) : '0';

  const query = {
    offset: String(Math.ceil(Number.parseInt(offset, 10) - 1) * 3),
    limit: '3',
  };
Pagination コンポーネントも totalCount と limit を元にcount(何ページ目か) を指定してあげています。
<Pagination
   count={Math.ceil(contents.totalCount / contents.limit)}
   variant="outlined"
   shape="rounded"
   color="secondary"
   page={offset}
   onChange={handleChangePage}
/>
これで以上です。お疲れ様でした。
さいごに
Next.js × microCMS で ページングを実装してみました。一覧ページを実装したけど、ページングがよくわからんって方に参考となれば幸いです。